Every exterior estimate we write in Hollywood starts the same way, and it is not with a tape measure. It is walking the house slowly and looking at what is already on the wall. From the driveway, a house that needs paint and a house that needs a repair look identical. The difference is in what the discoloration is made of.
There are five stains we find over and over on South Florida stucco: rust, mildew and algae, efflorescence, chalking, and alkali burn. They look different, they come from different places, and they need different work. What they have in common is that a stain is the end of a process, not the start of one. Something is putting it there. Cover it up without dealing with that something and you are buying a coat of paint that fails from behind, which is the one kind of failure you cannot fix from the front.
This guide is the version we give homeowners in Hollywood, Pembroke Pines, Miramar, Davie and Fort Lauderdale before we quote anything. Every number in it is sourced, and the sources are named so you can check them.
Start here: the ten-second test that tells you which stain you have
Before anything else, three quick checks at the wall will put you in the right row of the table below. Six patterns, five stains — rust arrives two different ways and is worth splitting. You need a rag, a hose and a bottle of household bleach.
- Rub it with a dry dark rag. If a fine white powder comes off on the cloth and the wall underneath looks like faded paint, that is chalking, not a stain sitting on top.
- Put a few drops of bleach on it. Sherwin-Williams gives this test in one sentence: "Test for mildew by applying a few drops of household bleach to the area, if it is bleached away, the discoloration is probably mildew; if it does not disappear, it is probably dirt." Ten seconds, costs nothing.
- Wet it with a hose. A white deposit that disappears while wet and returns white when the wall dries is efflorescence — salt, not dirt.
| What you see | What it is | Where it comes from | Can you paint over it? |
|---|---|---|---|
| Orange or rust-brown, fanning up from the bottom of a wall | Iron staining | Iron in irrigation water hitting the house | No — move the sprinkler first |
| Rust-brown streaks running down from one point | Rust, same stain, different source | A nail, bracket, railing or anchor corroding | No — treat the metal first |
| Black, gray, green or brown blotches on shaded walls | Mildew and algae | Damp surfaces with little direct sun | No — it grows back through |
| White, crusty or powdery deposit, worst after rain | Efflorescence | Salt carried out of the wall by moisture | Not while it is still forming |
| Chalky white film that rubs off, color looks faded | Chalking | The old paint film breaking down in UV | Only after it is fully washed off |
| Washed-out, blotchy or burned-looking new stucco | Alkali burn | Fresh, high-pH cement under the paint | No — the wall has to cure |
Swipe the table sideways to see all four columns.
1. Rust stains on stucco: sprinkler iron and corroding metal
Sherwin-Williams describes rust staining as "reddish, brown (or sometimes black) stains appearing as blotches or streaks on surface or paint," and puts the cause simply: steel exposed to air and moisture oxidizes, and the rust runs onto whatever is next to it.
In Florida it arrives two ways, and telling them apart takes about five seconds.
Rust from metal starts at a point and runs down. A nail head, a hose bib bracket, an AC line strap, a railing base, a window anchor, damaged galvanized hardware. You can follow the streak up to the thing making it.
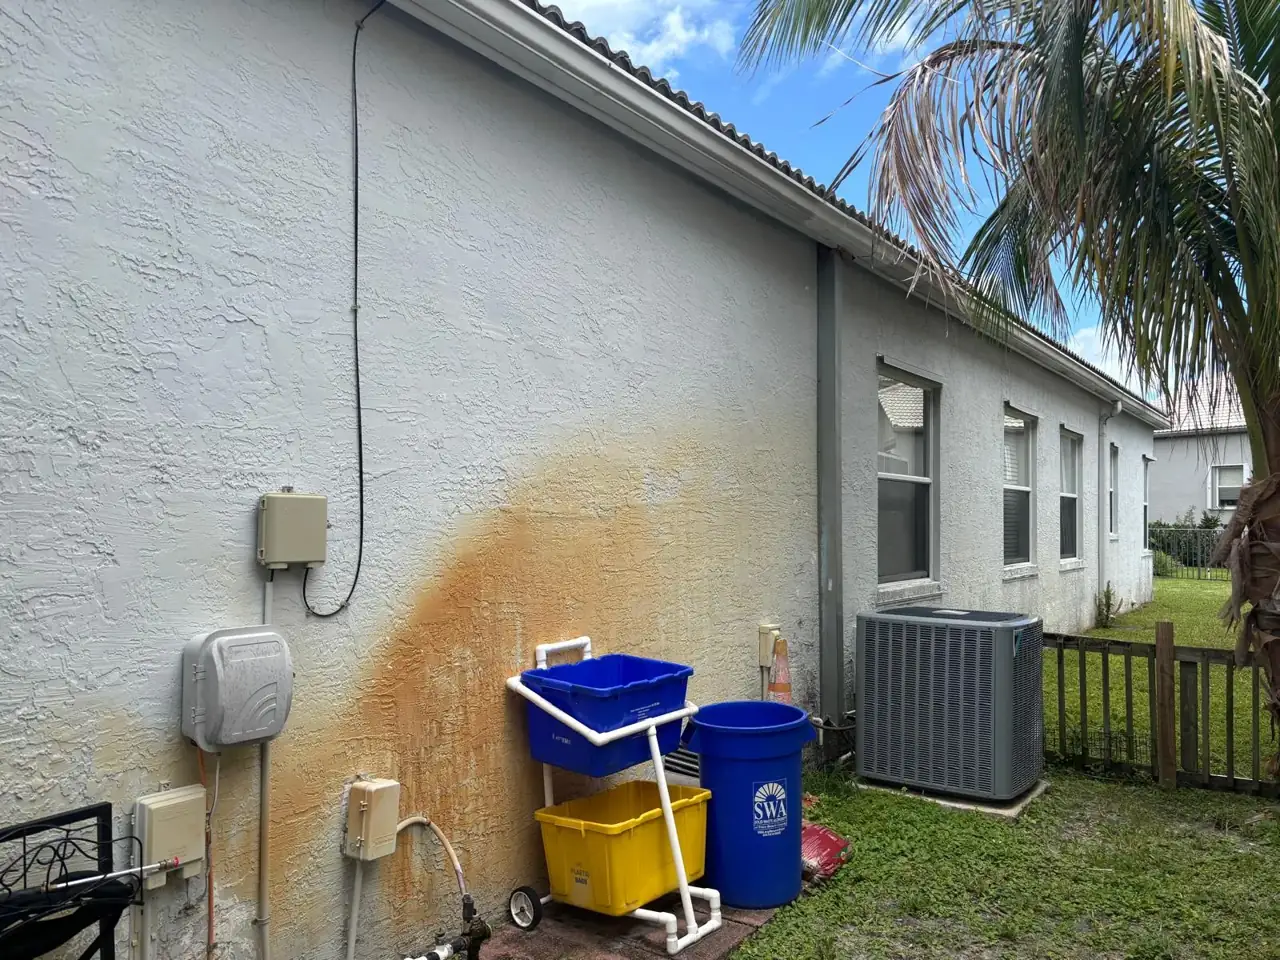
Iron staining from water blooms outward from the bottom of a wall. That is irrigation, and it is not a niche problem here. The University of Florida's Florida-Friendly Landscaping program states it plainly: "Most Florida well water is high in iron," and names the symptom we photograph on job after job — "orange streaks on the sides of buildings," with rust deposits on "anything the water comes in contact with, even plants." When a head throws onto the side of a house four mornings a week, the iron oxidizes on the surface and spreads in a fan, worst at the height the spray reaches and heaviest on the side the head sits on.
The fix depends on which one you have. For metal, Sherwin-Williams' first instruction is short: "Prime bare steel as soon as possible with a rust-inhibiting primer or finish." For the narrower case of rusted nails that cannot be pulled out, their sequence is exact, and the order matters: sanded to shiny metal, countersunk, coated with a rust-preventive primer, then caulked, filled or patched, and only then topcoated. Painting a rusting nail head with wall paint hides it for one season.
For irrigation, the wall gets cleaned and then the head gets moved, throttled or its arc changed so the spray stops landing on the house. We say this to homeowners on almost every job: if the sprinkler keeps hitting the wall, the stain comes back through the new paint, and that is not the paint's fault. It is a sprinkler problem wearing a paint problem's clothes, and it is the cheapest thing on this whole page to fix.
All five stains look like "the house needs paint." Four of them are the wall reporting a water problem or a cure problem. Find the cause first and the paint lasts; skip that and the same mark is back within a season or two, on your dime or ours.
2. Black and green stains: mildew, algae, and what the EPA says about bleach
This is the most common of the five here, and the one most often mistaken for plain dirt.
Sherwin-Williams defines mildew broadly — "black, gray, green, or brown spots on any surface" — and adds a line worth repeating to anyone who thinks their last painter used bad material: "Paint does not cause mildew." The conditions that do are simple: surfaces "that tend to be damp or receive little or no direct sunlight," and painting over a substrate that already had mildew on it.
Green growth on a north wall is usually algae rather than mildew, and for our purposes it does not matter much: both are living, both need moisture, and both are removed the same way. What matters is separating either one from dirt, and the bleach-drop test above does that in ten seconds.
The reason this belongs to South Florida more than to most of the country is the air, and the number is not a guess. NOAA's National Centers for Environmental Information publishes average relative humidity for US stations in its Comparative Climatic Data tables. For Miami, over the 1948–2018 record, morning relative humidity averages 82 percent for the year and 86 percent in September. West Palm Beach, the other long-record station bracketing our service area, is identical: 82 percent annual, 86 percent in September. North-facing walls, shaded walls and anything tucked behind a hedge stay wet the longest and go first.
The bleach question, answered honestly
Here is where we part company with the shortcut most pressure-washing ads give you, and we would rather tell you now than after you have paid someone.
The paint manufacturers give a bleach method, and for a painted exterior wall it works. Sherwin-Williams: "Before painting, remove mildew by washing the surface with a solution of 1 part liquid bleach and 3 parts water. Apply the solution and scrub the mildewed area. Allow the solution to remain on the surface for 10 minutes. Rinse thoroughly with water and allow the surface to dry before painting."
The EPA takes a different line, and it is the more important one to understand. Their guidance says: "The use of a chemical or biocide that kills organisms such as mold (chlorine bleach, for example) is not recommended as a routine practice during mold cleanup." Their reasoning is the part that changes how you should think about a stained wall: "Dead mold may still cause allergic reactions in some people, so it is not enough to simply kill the mold, it must also be removed."
Those two are not really in conflict. Killing is not the job. Removal is. A wall that has been sprayed with bleach and left to dry is a wall with dead growth still bonded to it, and paint over dead growth is paint over a contaminant. That is why our wash is a wash — chemical, dwell, agitation where needed, and a full rinse — not a spray-and-walk.
Two safety points, both from the EPA rather than from us. Their instruction is that if you choose to use disinfectants or biocides, you always ventilate the area and exhaust the air to the outdoors. And: "Never mix chlorine bleach solution with other cleaning solutions or detergents that contain ammonia because toxic fumes could be produced." Sherwin-Williams says the same thing in its own words, and adds eye protection, protective clothing, waterproof gloves, and washing off any of the mixture that touches your skin right away.
One honest caveat about the result. We have never told a customer that a paint job ends mildew forever, because it does not. Asked whether mildew can be permanently prevented, Sherwin-Williams answers: "No. Paints can be formulated to inhibit mildew growth, but under some conditions, mildew eventually will reappear on any type of paint." The goal is to remove what is there, coat a clean wall with a quality acrylic, and buy years instead of months.
One thing we are not: we are painters, not a mold remediation company. Surface growth on an exterior stucco wall is our work. Mold inside a wall cavity, on drywall, or anywhere connected to a leak or a health complaint is a licensed remediator's job, and we will tell you so and stop rather than paint over it.
3. Efflorescence: the white powder coming out of your stucco
Most people describe this one as "the wall is chalking" or "there's white stuff coming off." It has a name and a specific meaning, and it is a different problem from chalking entirely.
The Concrete Masonry and Hardscapes Association defines efflorescence as "a deposit of soluble salts and bases, usually white in color, that sometimes appear on the surfaces of masonry or concrete construction." Sherwin-Williams puts the mechanism in one line: "crusty, white salt deposits, which are leached to the surface of mortar or masonry as water passes through it."
Read that again, because the important word is through. Efflorescence did not land on the wall. It came out of the wall.
CMHA's technical note is the clearest explanation of why, and it is useful because it tells you what to remove. Three conditions have to be present at the same time: soluble compounds in the masonry, moisture to pick those salts up, and a force — evaporation or hydrostatic pressure — to move the solution to the surface. Take away any one of the three and the efflorescence stops. You cannot take the salts out of the block, and you cannot stop evaporation, so in practice the whole job is taking away the water.
Sherwin-Williams' own list of causes is almost all water, with one exception at the top: failing to remove all the previous efflorescence before painting. Then interior moisture escaping out through exterior masonry, exterior moisture driven through the wall by weather, basement walls not sealed against ground moisture — the one item on their list that does not apply to us — and new cement or mortar that has not been given enough time to cure.
There is one version that is not a defect. CMHA calls it new building bloom: efflorescence that appears uniformly across a facade right after construction is "normal water loss from the materials and the building," and it weathers away on its own. Patchy efflorescence on a house that has stood for fifteen years is not that, and it is telling you where water is getting in.
This is also the stain we most often find under peeling paint, and that is not a coincidence. The salt keeps arriving behind the film and lifts it off from the back. CMHA makes the parallel point about sealers, which people often reach for instead of fixing the water: applying a clear water-repellent treatment to a wall that tends to effloresce, without reducing the cause, "may lead to surface spalling of masonry units or deposits on the interior and/or exterior surface of the surface treatment." Trapping the problem is not solving it, whatever you trap it under.
The order of work is: find the water and stop it — roof, gutters, downspouts, cracked stucco, a planter bed holding moisture against the wall, a leaking irrigation line — then remove the deposit. Sherwin-Williams' method is to take it off "with a wire brush, power brush, or low-pressure washing," rinse thoroughly, and, on a badly alkaline surface, wash with a mild etching solution or muriatic acid. Acid on a house wall is not a homeowner project, and the neighboring trade is blunt about why: the Brick Industry Association's rule for brickwork is "Do not clean brickwork with unbuffered hydrofluoric or hydrochloric (muriatic) acid." And then the sentence we quote to homeowners more than any other: if the efflorescence keeps forming, delay painting. That is the manufacturer's advice, not ours.
4. Chalking: the stain that is actually the old paint
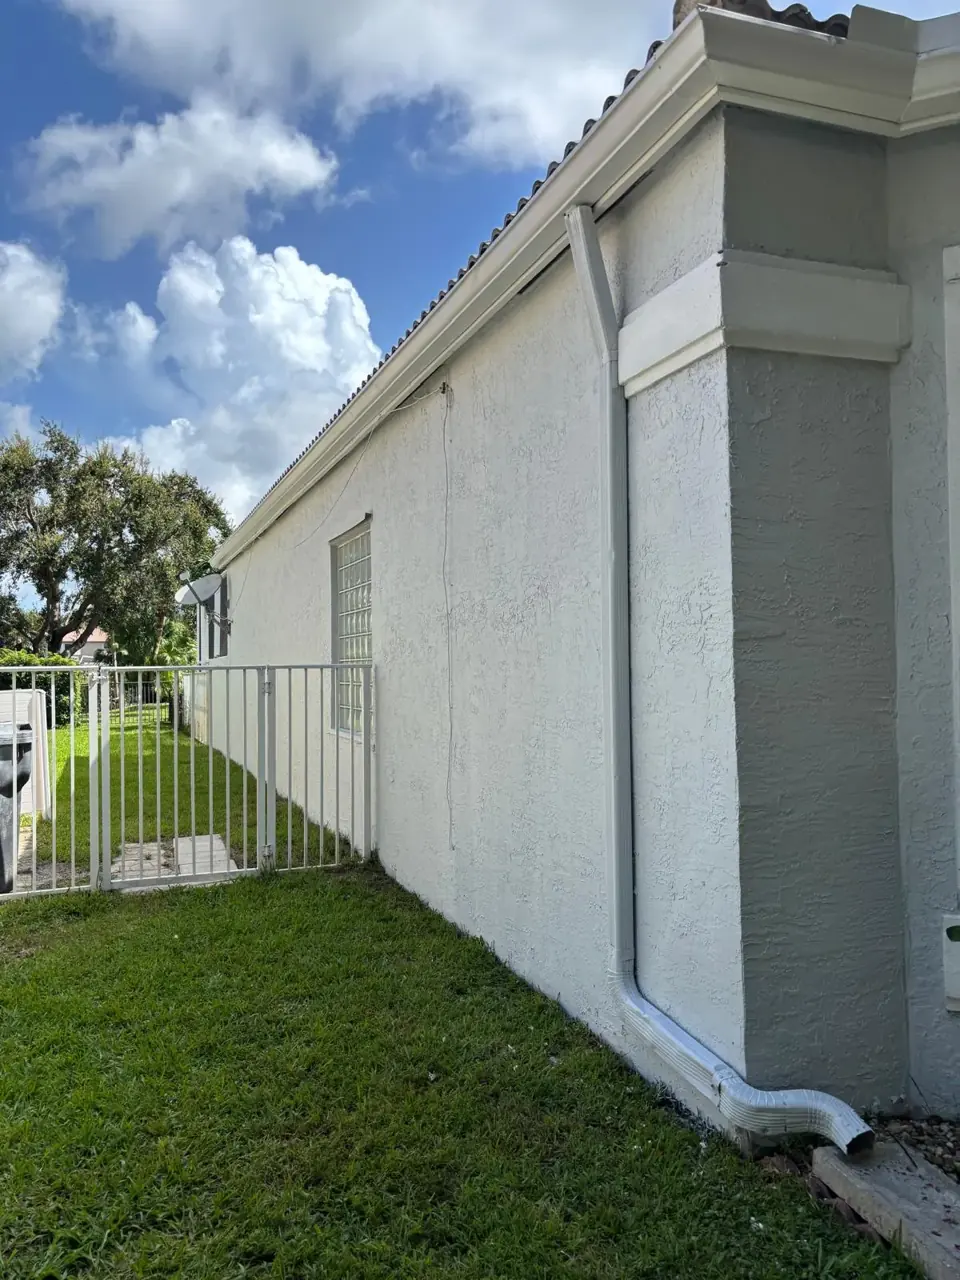
This one is left out of most articles, and it is probably the most common thing we scrape off a Broward house. Sherwin-Williams defines chalking as "the formation of fine, white powder on the surface of the paint film due to weathering, which may give the appearance of color fading."
That last clause is why people misread it. The house does not look stained, it looks tired — the color has gone flat and pale, and there may be white run-down streaks below the walls onto the driveway or the patio. Rub the wall with a dark cloth. If the cloth comes away white, the wall is chalking.
It matters for one reason: nothing sticks to chalk. Paint applied over a chalky wall is bonded to loose powder, not to the wall, and it will peel in sheets. Sherwin-Williams' remedy is unglamorous and exact: "Remove chalk by washing or power washing the surface with an appropriate cleaner," then — and this is the step that gets skipped — "If some chalk remains after first washing, then wash again for complete removal; scrubbing may be necessary." Rinse well, let it dry thoroughly.
Their prevention note is also the honest answer to "why did the last paint job only last four years": cheap, highly pigmented paint chalks faster, oil-based chalks more than latex, and thin application chalks sooner. "For the best resistance to chalking, use higher-quality acrylic coatings." On a sun-facing South Florida wall, that is not an upsell, it is the whole difference.
5. Alkali burn: why new stucco and fresh patches wash out
This is the one almost nobody has a name for, and we see it on new construction and on fresh patches all over western Broward.
Sherwin-Williams calls it alkali burning and defines it as "color loss and overall deterioration of paint film on fresh masonry, concrete, or stucco." The cause is chemistry, not dirt. Stucco and mortar contain hydrated lime, which the trade calls "hot" lime, added to make the material workable. Fresh, those materials sit at a pH of 13 to 14. In their words: "It takes approximately 30 days for fresh materials to drop to an approximate pH of 9."
Paint it before that happens and moisture sets off a reaction behind the film. Their exterior troubleshooting page spells out the result: if the high alkalinity "is not addressed prior to painting, a reaction can occur when moisture is present, resulting in blistering, peeling and burning stains." On the wrong product it is not even slow. Their separate page on alkali burning notes that the alkalinity of a hot surface "will destroy an alkyd or oil product within 6 months," that a vinyl acrylic does slightly better before failing anyway, and that acrylic is the coating that actually holds.
How long to wait is where the sources differ, so here is all of it rather than the one number that suits us:
- Behr: new stucco holds a lot of moisture, so "allow a full 30 days before coating."
- Benjamin Moore: "wait at least 60 days before painting" new stucco, and for larger cracks, seven to 10 days after making the repair before painting old stucco.
- Sherwin-Williams: roughly 30 days for the pH to reach about 9. If a 30-day wait is impossible, allow a seven-day cure and a pH below 13, then prime with their Loxon Acrylic Masonry Primer.
- The Stucco Manufacturers Association adds a different requirement rather than a longer wait, and it is the line worth knowing if your house is new: "New stucco (within the first year of application) should be primed and painted with the paint manufacturers' coatings designed for high pH surfaces." For a full year, in other words, the product matters as much as the timing.
Our working rule is blunter. If somebody patched that wall this week, the wall is not ready this week. A patch skimmed and painted the same afternoon is a burn stain with a date on it.
There is a related Florida trap in the same family. Sherwin-Williams lists "heat blistering caused by painting in direct sunlight on a surface that is too warm" as a cause of paint lifting off the wall — which is exactly what happens on a west elevation at two in the afternoon in July. We chase shade around the house for a reason.
When it is not a stain: cracks, water damage and stucco repair
Three things get called stains that are really the wall telling you about water. If you see any of them, the paint conversation comes second and a stucco repair conversation comes first.
- Cracks with discoloration running out of them. Some cracking is normal — the Stucco Manufacturers Association notes that "some cracking is to be expected and can be commonly seen radiating from the corners of windows and doors." A crack that is staining is a crack that is carrying water. It gets opened, patched and sealed before color goes anywhere near it, and on a wall that is moving, waterproofing comes before that.
- A wall dark at the bottom on one side that never dries. Grade too high against the stucco, a downspout dumping at the wall, a planter, or a leaking irrigation line. Sherwin-Williams' own description of moisture blistering is "the migration of water through an interior wall to the exterior, thus pushing the paint off of the surface." Paint over a wall that is wet behind and the film comes off in sheets.
- Bubbling or blistering that flakes down to bare stucco. That is a bond failure, not a surface stain. Everything loose comes off before anything new goes on, and the reason it let go has to be identified or the new coat does the same thing.
None of that is bad news, exactly. It is a different job order. A house we repaint after fixing the cause holds its color for years. A house we repaint over the cause is a warranty call with a delay on it.
Washing stucco without wrecking it
All five stains start with cleaning, and cleaning is where stucco gets damaged more often than by anything else that happens on a paint job.
The Association of the Wall and Ceiling Industry ran the question in its Q&A column — how do you clean a small 15-year-old commercial building clad in EIFS — and five of its members answered separately: two company presidents, a vice president, an estimator and a purchasing agent. Their answers are worth reading. A purchasing agent at a wall contractor: "low pressure (300 to 400 psi is plenty)." The president of a restoration company: "low volume and low pressure (1,200 to 1,800 psi)." The head of another firm would not use a pressure washer at all on a system that tired. On technique: a "30 degree wide nozzle at a distance from the wall of 3 to 5 feet or farther (not closer)," wet the wall before the cleaning solution goes on, and rinse from the top down. And the line that belongs on the side of every machine, from one of the same five: "It is the chemical that does the cleaning, not the pressure on the pressure washer."
Those figures come from EIFS, the synthetic stucco system built over foam board, which is the most fragile version of the surface. In our experience traditional cement stucco takes more than that. But the failure mode is identical and we see it constantly on houses somebody else washed: a tight fan tip held close, and the wall comes back with the finish coat striped off it in lines, or with water driven in behind sound paint where it will push the next coat right back off. On a wall with efflorescence, high pressure is worse than useless — you are forcing more water into the exact wall that already has too much.
Both Behr and Benjamin Moore still call washing the right first step, and so do we. Benjamin Moore recommends going over the surface with a soft-bristle vinyl brush to loosen debris before washing at all, and calls pressure washing "the best way to get it clean before you start painting." Behr's new-stucco prep sequence carries the step people skip: pressure wash to remove dirt and chalk, and allow 24 hours to dry. On a humid week we give it longer, because a stucco wall holds water you cannot see.
That is the whole reason our pressure washing in Hollywood and across Broward is set up the way it is: low pressure, the right chemical for whichever stain is actually on the wall, a real rinse, and a full day before a brush touches the house.
What it costs to skip this
Paint is a film, and a film is only as good as the thing it is stuck to. That sentence is the whole article.
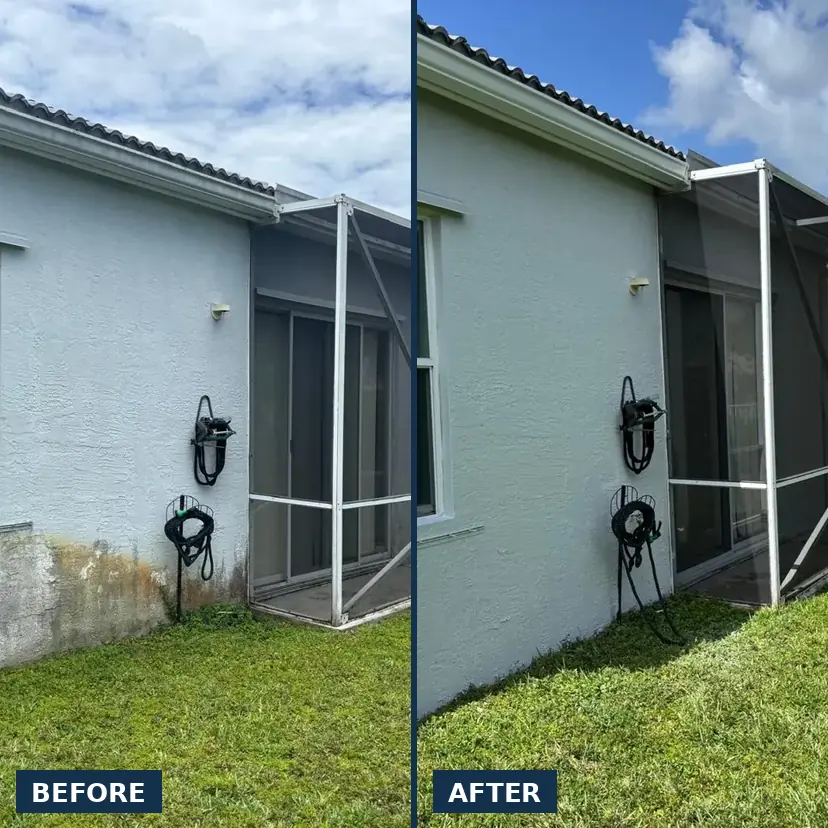
Mildew keeps growing. Salt keeps arriving. Iron keeps depositing. Chalk stays loose. Lime keeps reacting. In every one of those cases the new coat fails from behind, which means you do not see it coming and you cannot repair it from the front — the wall has to be stripped back and done again. That is why an honest estimate on a stained house is mostly labor, and why the cheapest quote on a stained house is usually the most expensive one.
If you want the longer view on timing — how often a South Florida exterior actually needs redoing, and what shortens it — that is written up here. If your wall is clean and the question is finish rather than failure, limewash and high gloss are the two we get asked about most.
Not sure what is on your wall?
Send us a photo on WhatsApp. We will tell you which of the five it is, whether it needs washing, repair or curing time first, and quote the whole thing in writing. Free estimates across Hollywood, Pembroke Pines, Miramar, Davie, Fort Lauderdale and the rest of Broward.
Get a Free Estimate 💬 WhatsApp Us